Monthly Archives: May 2012

Slow Cooker Pulled Beef Sandwiches

I am so fortunate to have been blessed with some amazing friends, seriously, I consider myself to be a very lucky lady. I’m even more lucky to have friends who can cook, or in this case, a friend’s awesome boyfriend that can cook! I’ll refer to them as Mr. D and Ms. N, they had me over before I moved out East, and Mr. D made these amazing Pulled Beef sandwiches and Ms. N made this intensely seductive chocolate cake (which I’ll post soon), ever since then, me and mine have been making these at least once a month. The best part? You put the meat in the slow cooker and pull it out (literally and figuratively) in the evening when you’re ready for dinner! You MUST try this; it will blow your mind.

Slow Cooker Pulled Beef

1 Tbsp Canola oil or olive oil for searing
1 eye of round or top round beef roast
2 onions, halved and thinly sliced
1 ½ cups beef stock
1 ½ cups Barbecue sauce
2 Tbsp Brown sugar
2 Tbsp Balsamic vinegar
2 Tbsp Grainy mustard
A few cloves of garlic, crushed
Hot pepper flakes to taste
1 tsp pepper

  1. Heat oil in frying pan over medium-high heat, sear both sides of beef
  2. Add all remaining ingredients into the slow cooker
  3. Add beef
  4. Cook for 8-10 hours on low

That’s it! We serve it on hamburger buns with mixed greens, mayo, cheese and Dijon mustard (yes, in the photo above I jammed some plain ruffled potato chips in there as well, heh). Sometimes I just put it on top of a salad or in my eggs in the morning. Delish.


Quinoa Stuffed Chicken Breast

Quinoa is high in protein and is a complex carbohydrate; in my opinion, the best combination ever.  I love cooking with quinoa, it’s so easy, and it takes on flavour so well.

Ok, so, stuffing chicken breast was a lot harder than I thought, and it didn’t help that it was late and my husband and I were both starving.  When I make this dish again, I’ll be sure to prep it ahead of time and buy fresh chicken breast; not attempt to thaw out the frozen ones I had enough to slice them in half, pound them flat, and stuff them.  Sheesh!

Cook Quinoa according to package directions.  I use low sodium chicken broth in place of water, just for added flavour, but it’s up to you.

1 medium onion, chopped
2-3 cloves of garlic
1″ piece of ginger finely chopped
2-3 stalks celery
1 Tbsp Hoison Sauce
1 Tbsp Low sodium soy sauce
1 ½ tsp Chinese five spice powder
1 tsp black pepper
¼ tsp chili pepper
3 carrots sliced
brussel sprouts

Preheat the oven to 350

Spray a large pan with Pam, and sauté the onion and garlic until the onion is translucent, add the ginger and cook for about 3 minutes, add in the celery and sauté until cooked through but still crispy, add in the cooked quinoa along with the hoison sauce, soy sauce, Chinese five spice, black pepper and chilli pepper, taste, adjust accordingly.

Now, the fun part!

  1. Have some thread handy and cut so you can tie the breast as soon roll it up;make sure your chicken breast is fresh, or thawed out completely.  Slice the breast in half, lengthwise, and then pound flat.
  2. Take a couple of teaspoon fulls of the quinoa and place on one end of the chicken and roll it up carefully, some of the filling will fall out, no big deal.  Tie it up securely and place in a baking dish ( I pan fried the ones in the photo, but in hindsight, it is WAYYY easier to bake them, you get a more even cooking of the chicken.) keep going until all your chicken is stuffed, I did about 5 breasts cut in half and we had plenty left over.
  3. Bake for about 20-25 minutes, or until the chicken is golden brown and cooked through.
  4. Meanwhile, steam the carrots and brussel sprouts
  5. Once your chicken is done serve on top of the remaining quinoa, alongside the carrots and brussel sprouts.

 Dinner!


The ‘Grandma’s-is-better-but-this-will-still-make-you-sing’ Quiche

I remember in high school I was over at my friends’ place and their grandma had made quiche, and I swear it was the best thing I had ever tasted. Ever since that day I have been trying to find a quiche that tastes the same, I never made it myself though, because back home no one in the family liked it (gasp!). Now that I have my own house, my own kitchen and a husband that will basically eat anything that I put in front of him (love that man). it is not quite grandma’s but it is pretty damn close! I’ve made it about three times since I got to Nova Scotia in December and each time I think it tastes better and better. I’d love to make it more, but my body can’t take it all the time, I make mine with milk to make it a little less fatty because the crust takes quite a bit of butter, I like to cut the fat whenever possible, but it seems that with Quiche, it’s a little hard to do! I’ve provided the basic quiche recipe, but I always add more to it, bacon, onions, something green (asparagus, broccoli, brussel sprouts, etc), and cheese; you can add whatever you want and it will taste amazing. I apologize for the photos for this post, all the lights in my kitchen decided to go to shit right when I pulled this one out of the oven, that, and I managed to get my ugly pot holder in the shot as well…blech.

Crust

1 ¼ cup all purpose flour
½ tsp salt
½ tsp sugar
½ cup (1 stick) unsalted butter, chilled, and cut into small pieces
2-4 Tbsp ice water

  1. Preheat the oven to 425 (I only did 350 because my oven is completely wonky)
  2. In a large bowl, combine together the flour, salt and sugar. Add the butter and cut it in with a pastry blender or two knives until the butter is cut into the size of peas. After the butter has been cut into the flour mixture work it in as much as you can with your hands (I find you get a much flakier crust this way)
  3. Add cold water one tablespoon at a time, mixing with a fork until the dough holds together without feeling wet or sticky
  4. Gather the dough into a ball and flatten into a disc and cover with plastic wrap, chill in the refrigerator for an hour or in the freezer for about 15 minutes
  5. On a lightly floured surface roll out the dough to fit the size of a pie plate, make sure you have enough coming up the sides, the dough shrinks a bit during the baking process. Keep adding flour to the surface as you roll it out to keep it from sticking. Work as quickly as possible to ensure the dough doesn’t get too warm; if it does get warm as you roll it and it becomes hard to handle, put it in the freezer for about 5 minutes. Once you get it to the desired thickness, press it into the pie plate, or round tart pan with a removable bottom.
  6. If you get any tears or holes in your dough, patch them up with some extra dough with a little bit of water. You can also clean up your edges with a rolling pin to remove any excess dough, but I just leave my on there, it shrinks down anyway and I like extra crust on my quiche.
  7. Add pie weights (I use kidney beans in a piece of tin foil) to crust and bake for 10-15 minutes. You can skip this step entirely if you wish, and pour the filling in straight away and bake, but I like to make sure that the crust is semi baked so that it is completely done when the quiche comes out of the oven. I’ve tried it without baking the crust first, and I find that the bottom of the crust is too soft for my liking, but it is up to you.

Quiche Filling

4 Eggs
1 ½ cups whole Milk ((or cream, you choose) I use 2%)
salt and pepper to taste
½ cup cheese (optional)
filling of your choice. For the one pictured below I used bacon, onions, green onions and broccoli.

  1. Preheat oven to 350
  2. Whisk the eggs and milk into a bowl until combined
  3. Add in salt, pepper, and fillings (I put my cheese in at this step; you may choose to sprinkle it on top of the quiche before it goes into the oven)
  4. Bake for 35-40 minutes/ Quiche will be a gorgeous deep golden brown colour when it is done
  5. Let cool for 5-10 minutes before slicing

I love to serve quiche with a simple spinach salad, or with some parboiled asparagus sautéed lightly in some butter and garlic (or plain too!)

I doubled this recipe as we have my father in law visiting us from BC and I like to have some food on hand for lunch and such, I ended up with some extra filling, but no crust. I poured the filling into cupcake pan and baked for about 35 minutes, let them cool, wrapped them and put them in the freezer. Yum!


Strawberry Scones

Image

Summer! I can almost taste it, it’s soooo close. I almost can’t stand the wait much longer, if you’ve ever experienced the beauty of the east coast, you’ll know what I’m talking about. The sunny spring days are blowing my mind, I can’t wait to freakin’ see what the summer has to offer. One thing I do know for sure is, the fresh produce is fan-frickin-tastic out here; I love farmer’s markets; I love strawberries. Love them. LOVE.

I also love breakfast, I’m pretty sure I mentioned in my bacon pancakes post, about mine and my husband’s love affair with breakfast. I especially love pastry’s and butter filled goodness, and everything oh-so-bad for me for breakfast…like scones. Oh mama! My favourite scones are cheese scones, and I eat them with strawberry jam (thank you Kimbot), and then my next favourite are strawberry scones, with, you guessed it, melted cheese; hot damn! I decided that I would have to make some, since having a super part time job wasn’t going to start paying for lavish pastries anytime soon, and because any money I’ve been making has been going to cheese and beautiful vintage goods from Fancy Lucky Vintage out in Lawrencetown (And a spot at Plan B in Halifax as well!). Anywho, here’s what I came up with; (I used a basic scone recipe and added some extras)
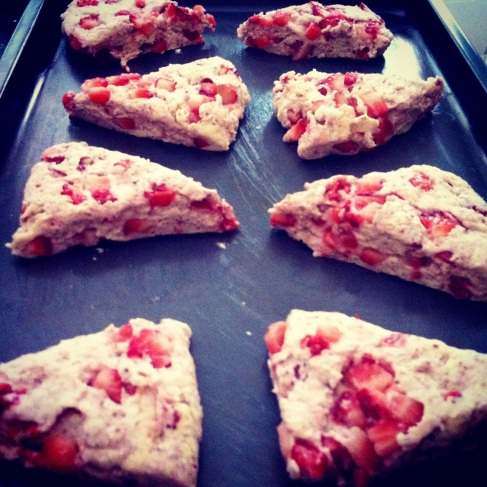
Strawberry Scones

1 cup strawberries (or other fruit)
3 tablespoons sugar (granulated)
2 cups all-purpose flour
2 teaspoons baking powder
1/4 teaspoon salt
6 tablespoons butter, in cubes, slightly softened
2/3 cold buttermilk (you can also use the same amount of cream or half and half)
1Tbsp ground flax (optional)

Preheat oven to 400 degrees. Lightly grease a cookie sheet.

Cut fruit into bite-sized pieces. Sprinkle fruit with 1/2 tablespoon sugar; set aside. Be sure to make the pieces small, or they tend to fall out of the dough.

Combine remaining sugar with flour, baking powder and salt. Add butter, using a pastry cutter or 2 knives to cut in the butter (after I cut in the butter, I use my fingers to be sure butter is evenly mixed into flour). Stir in fruit; then add buttermilk all at once. Use a spatula or wooden spoon to gently stir dough until it holds together.

Turn onto a lightly floured surface and knead a few times to incorporate dry ingredients. Be gentle so you don’t break up the berries and don’t overwork the dough; sprinkle dough with flour if it gets too sticky.

Lightly press the dough into a circle approx. 3/4 inch thick. If any berries pop out, push them back into dough. Cut circle into 6-8 wedges, then transfer wedges to the cookie sheet, leaving at least 1/2 inch of space between them. Bake 20-25 minutes or until the tops are lightly browned and spring back with you push them in. **Please note that the baking time varies depending on your oven! My scones took about 40 minutes until they were perfect, so keep a very close eye on them, you do not want them to under, or over bake. **

Image